
Christmas Gift Tags

One year for Christmas I wanted to make my own gift tags, but out of fabric, not paper. There were all kinds of strips and scraps left over from Christmas themed class samples (and gifts) that I had made that year and I didn’t want them to go to waste. Wider strips were cut narrower and they were all sewn together into a large square.
I wanted them to be robust enough to then be used as Christmas tree ornaments after the gifts were opened. Adding Peltex stiffened the tags, and using a solid white or cream fabric backing meant that writing could be added to the back with a permanent marker…gift tag to ornament with a personal touch.
(***scroll to the bottom of the page for a print friendly PDF)
For this project you will need the following (to create approximately 12-15 tags):
enough narrow strips and scraps to make a 12-13” square
one 12-13” square of double sided fusible Peltex (Pellon 72F) or equivalent
one 12-13” square of white, cream or other light coloured solid fabric
1/8” ribbon, narrow cording or rattail cord for hanging loop (8” length per tag)
matching/coordinating thread for decorative stitching around each tag
optional crystals (glue-on or heat set)
First sew all the strips together and press in one direction. Notice that there are a couple segments in this block made from strip-pieced units left over from another project that are included…just using up what I already had. There really is no right or wrong to this project…I also have made them before using the crazy quilting technique. This square of fabric was approximately 13” (figure 1).
The Peltex was cut slightly smaller than the fabric square to protect the iron from the glue when fusing, and the backing fabric is cut the same size as the top. Before fusing, be sure to check that there aren’t any dark threads between the backing and the Peltex or they will show. Using steam and the cotton setting on the iron fuse the 3 layers together (figure 2). First pressing the top until it’s fused then turning it over and doing the same for the back.
Straighten one corner with the ruler and rotary cutter making sure that the Peltex comes right to the edge (figure 3).

figure 1
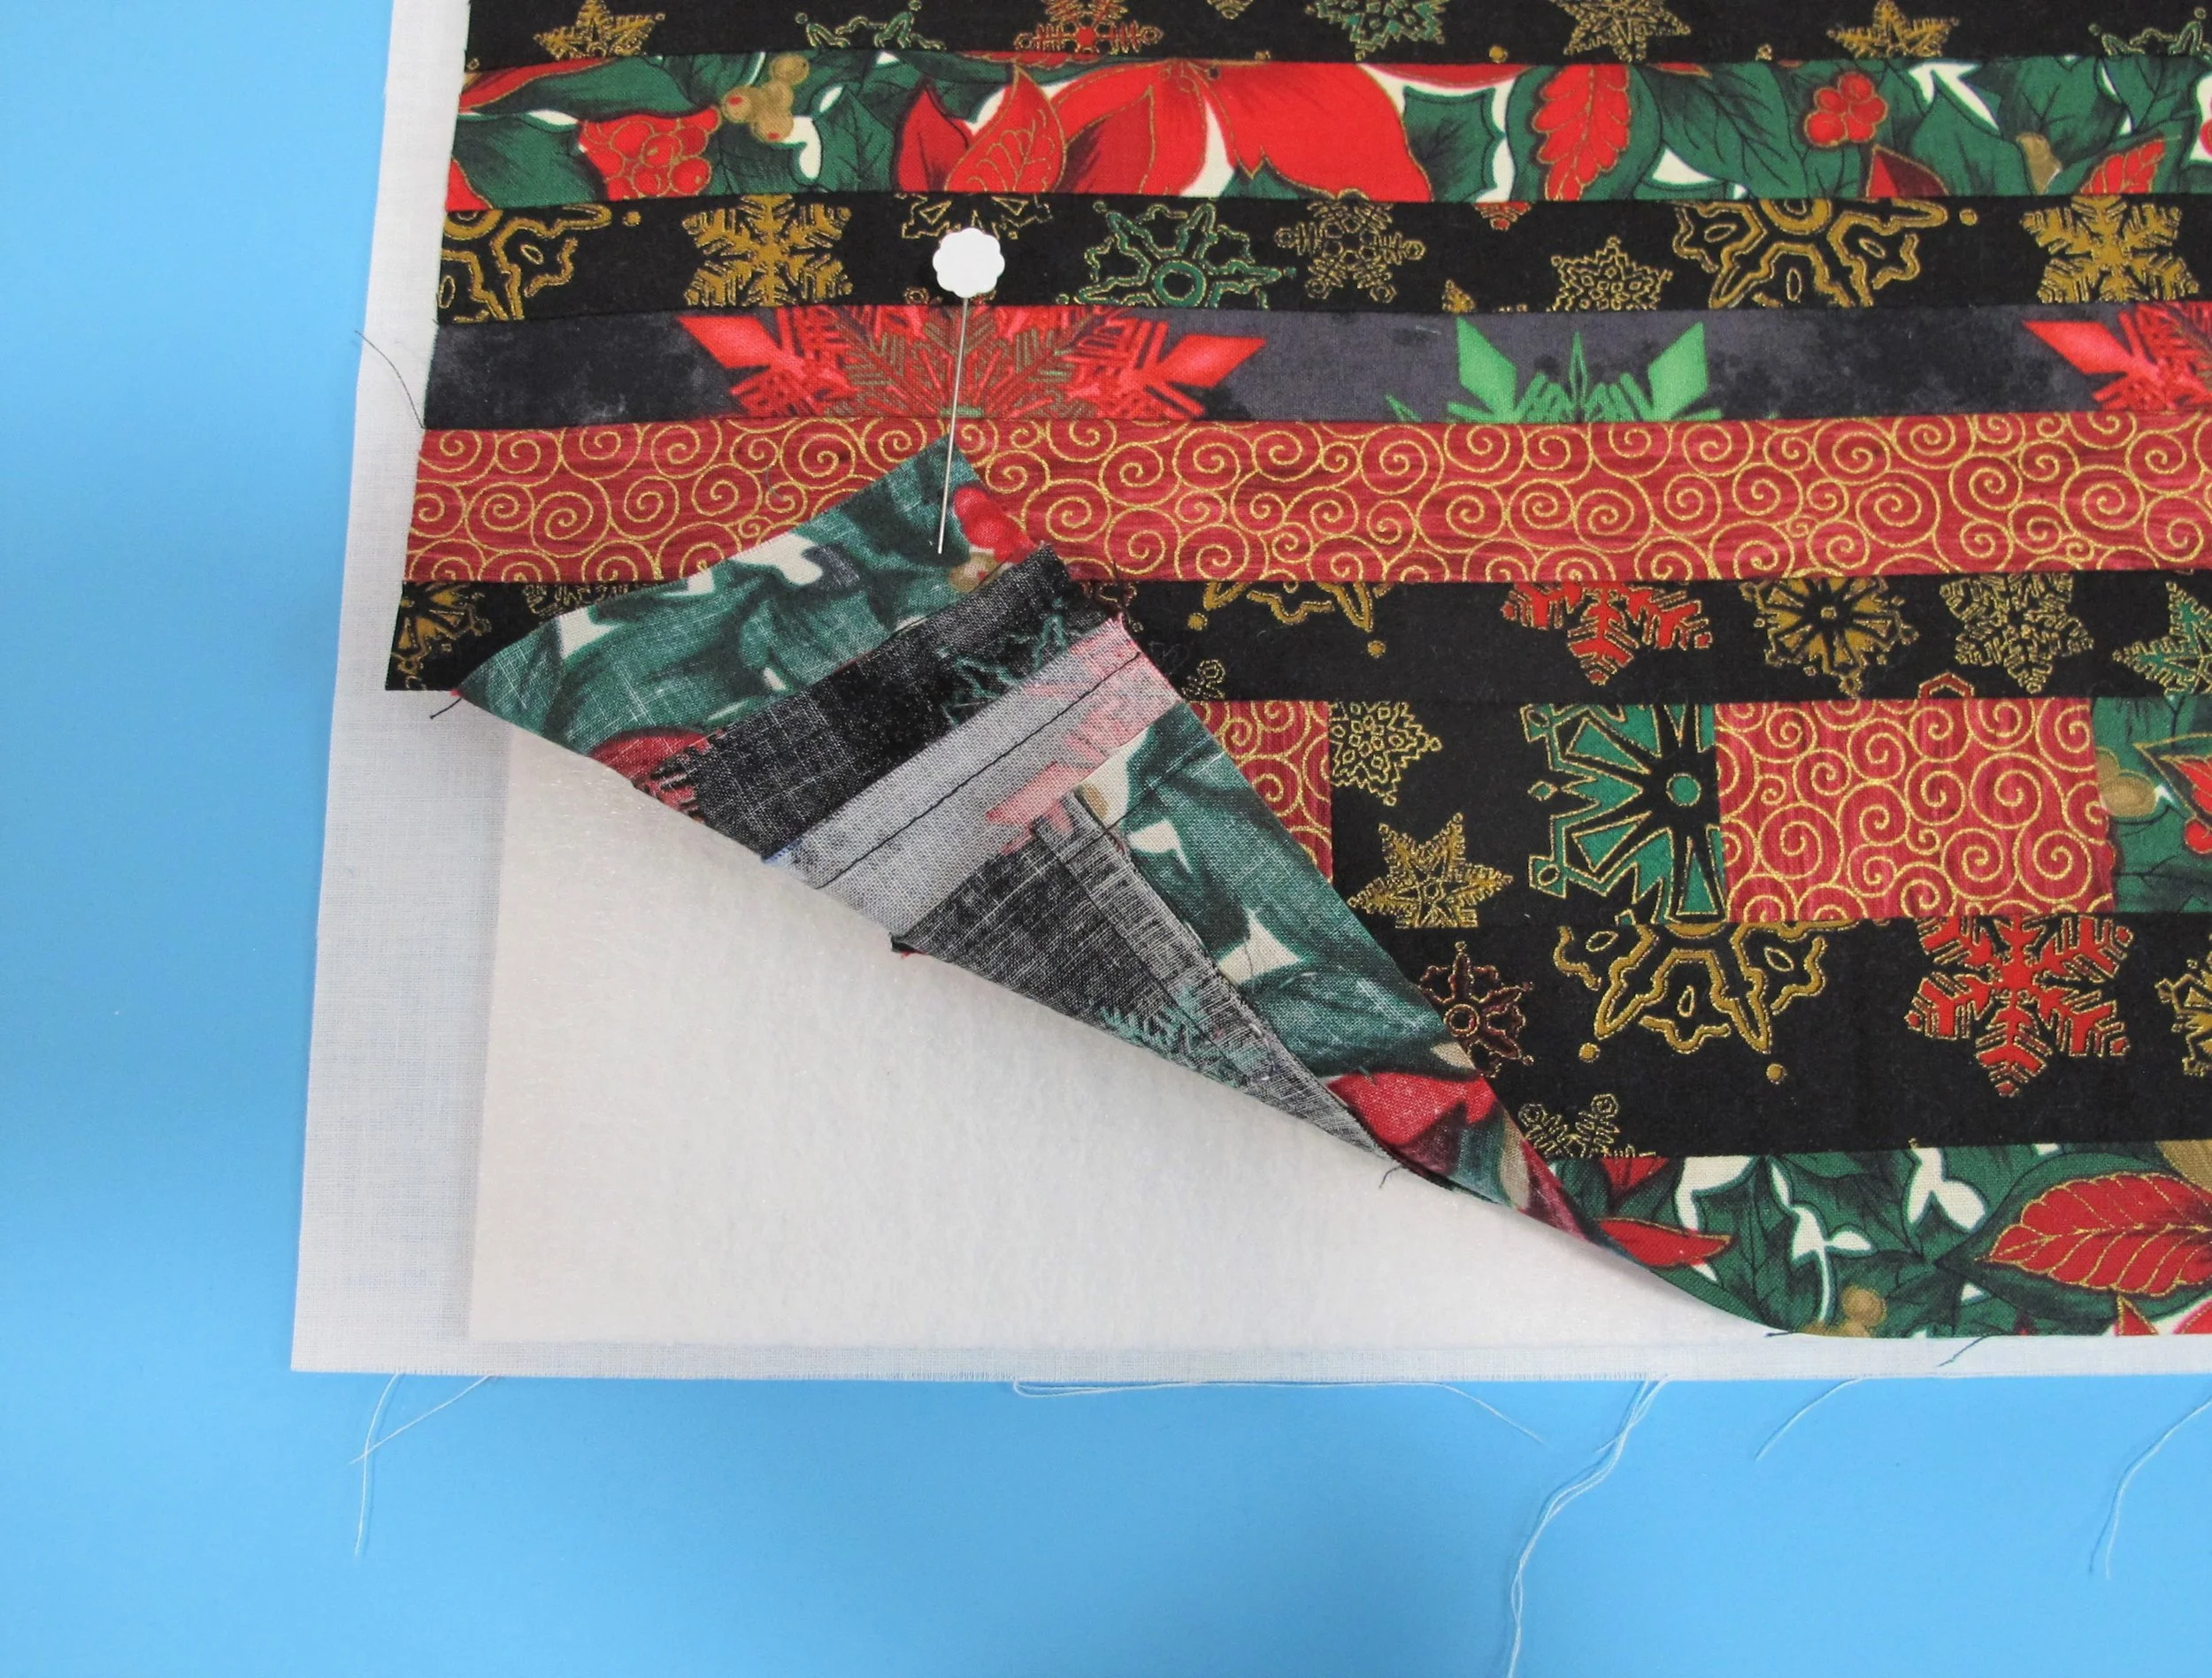
figure 2
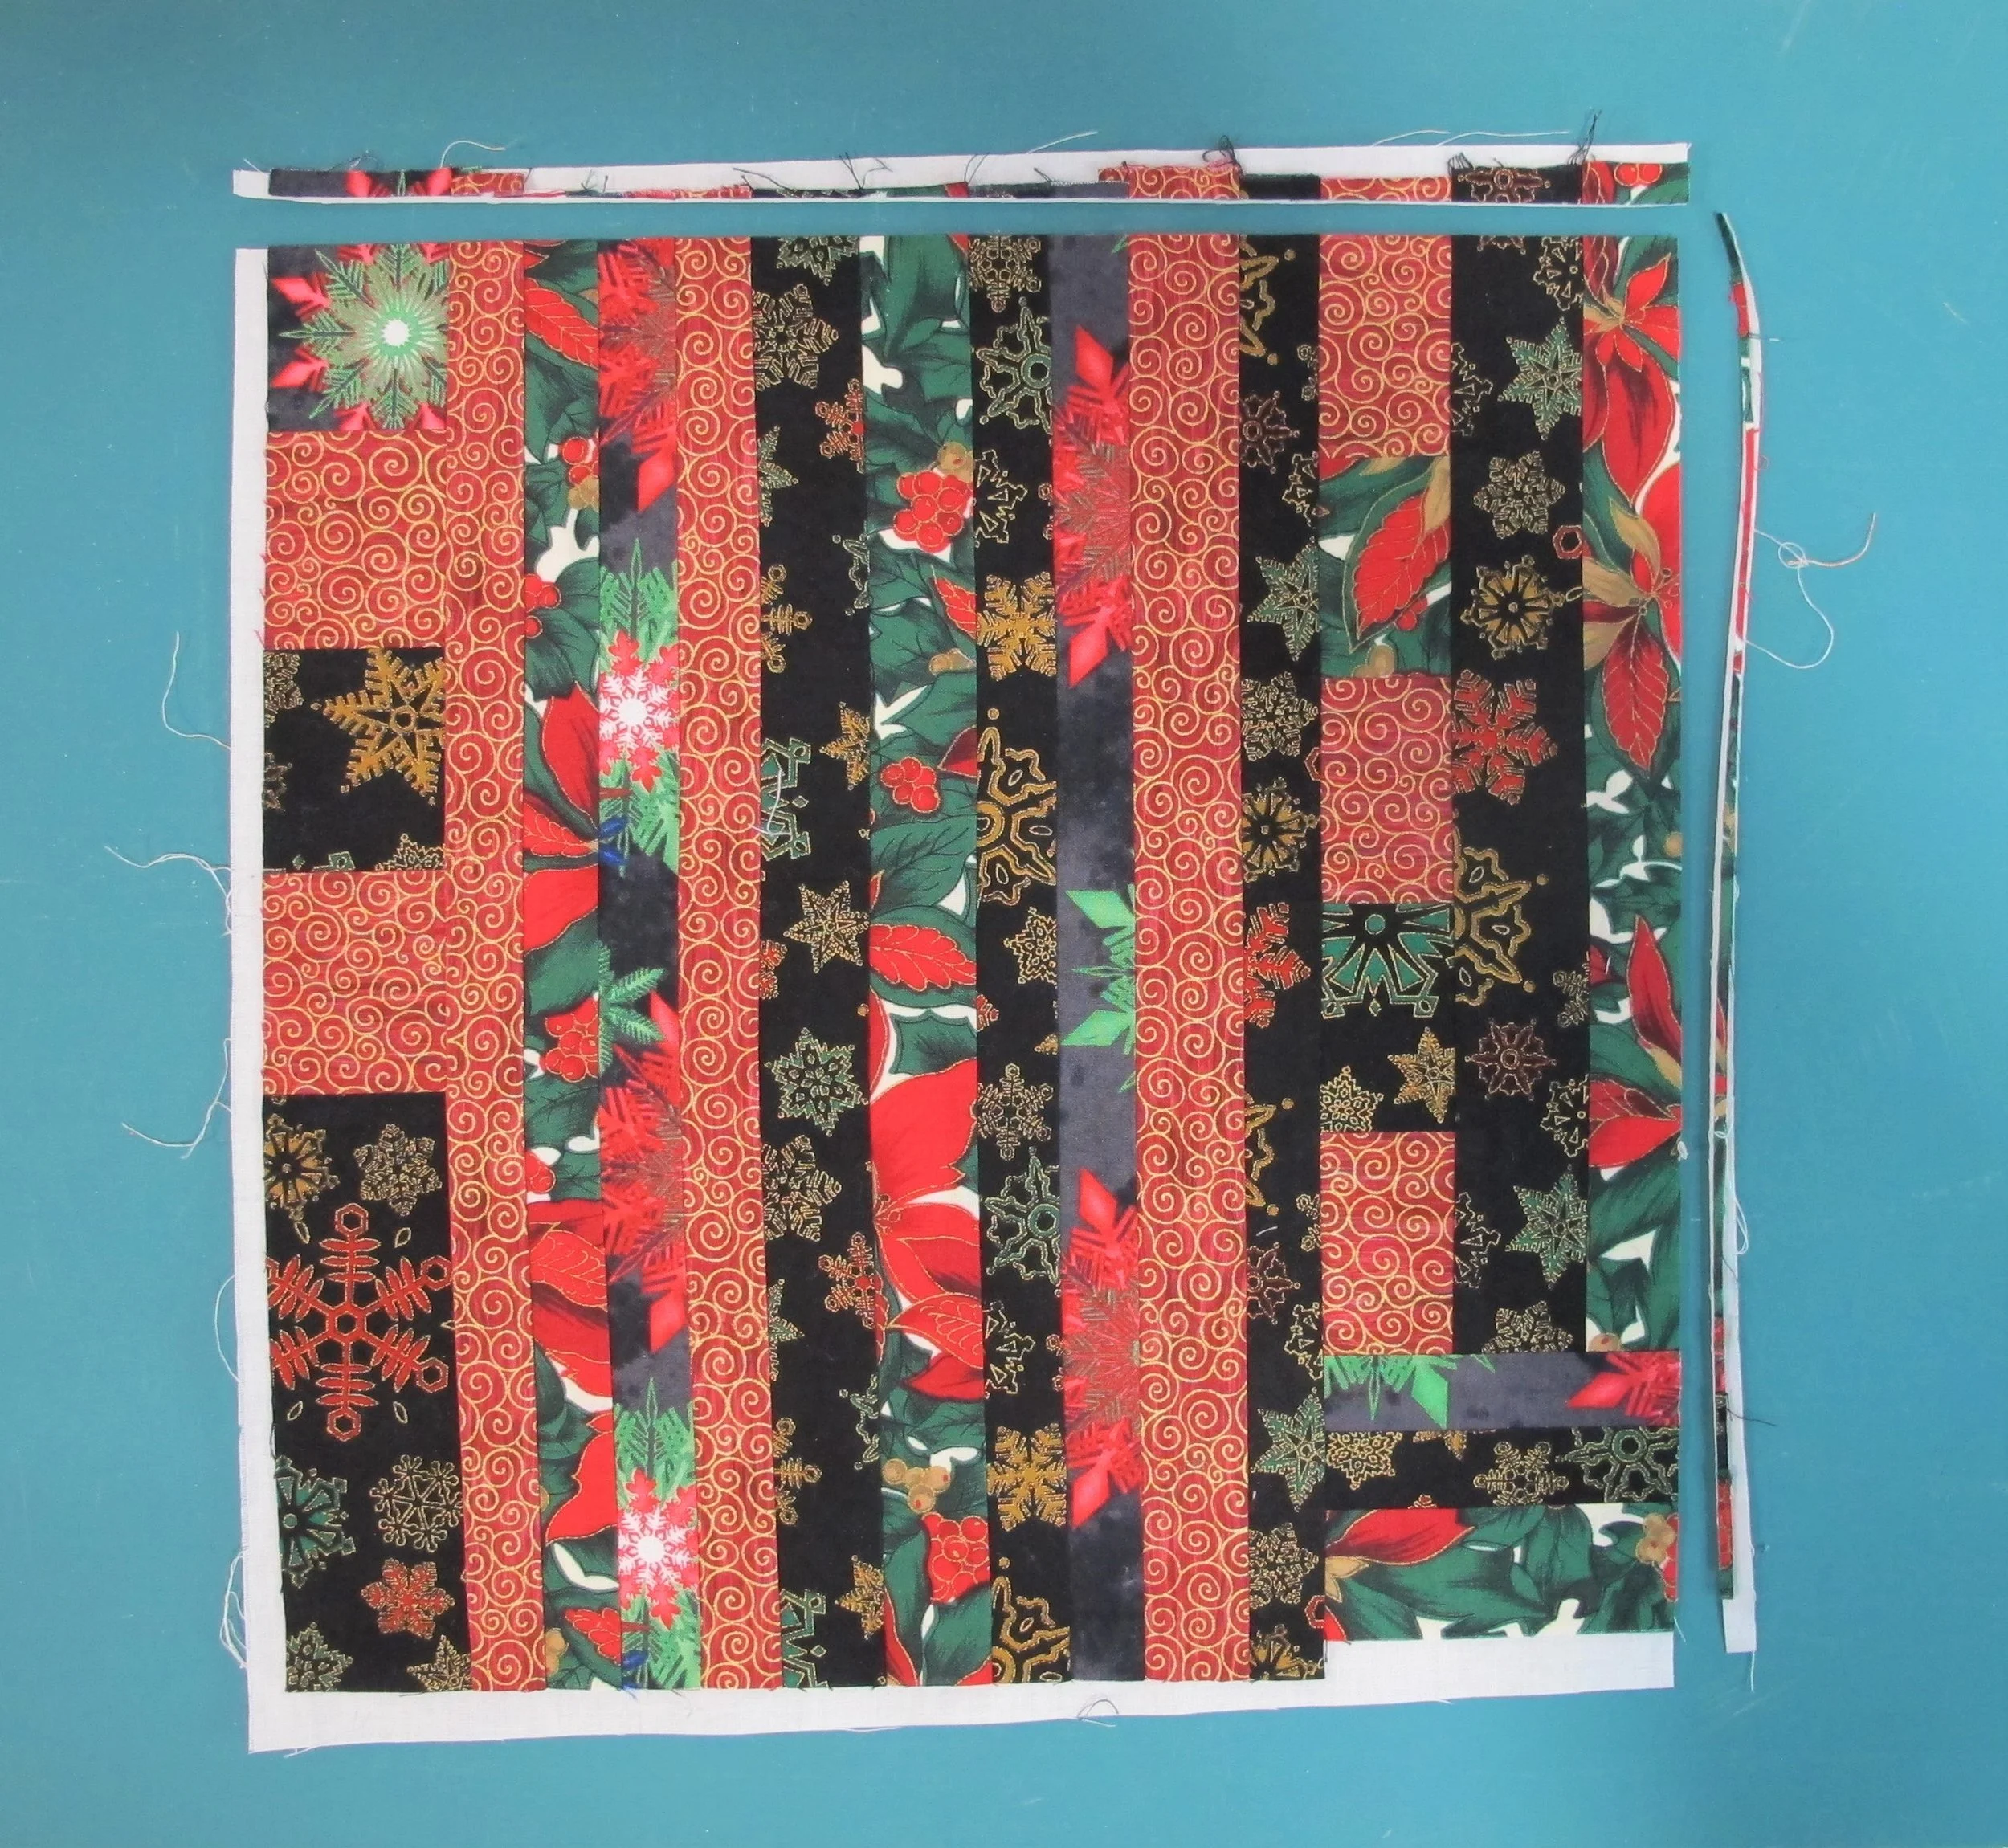
figure 3
On that nicely trimmed corner place the 60º line (here it’s a white line) from the ruler on the top cut edge at least 1 ½” in from the right side where the awl is pointing (lefties…do everything mirror image to what I have here for instructions) and cut that little corner off (figure 4).
Now turn the fused block around and place that cut corner at the bottom left. Cut 2 ½” strips all the way across until you run out of usable fabric (figure 5).
After the strips are cut, cut 2 ½” segments from each strip creating 60º diamonds. Cut as many as you can from the strips (figure 6 & 7). There will be a couple of larger scraps left over…create smaller diamonds or cut other shapes from those. ***Sharon’s tip: keep all the off-cuts for testing decorative stitches and markers later.

figure 4
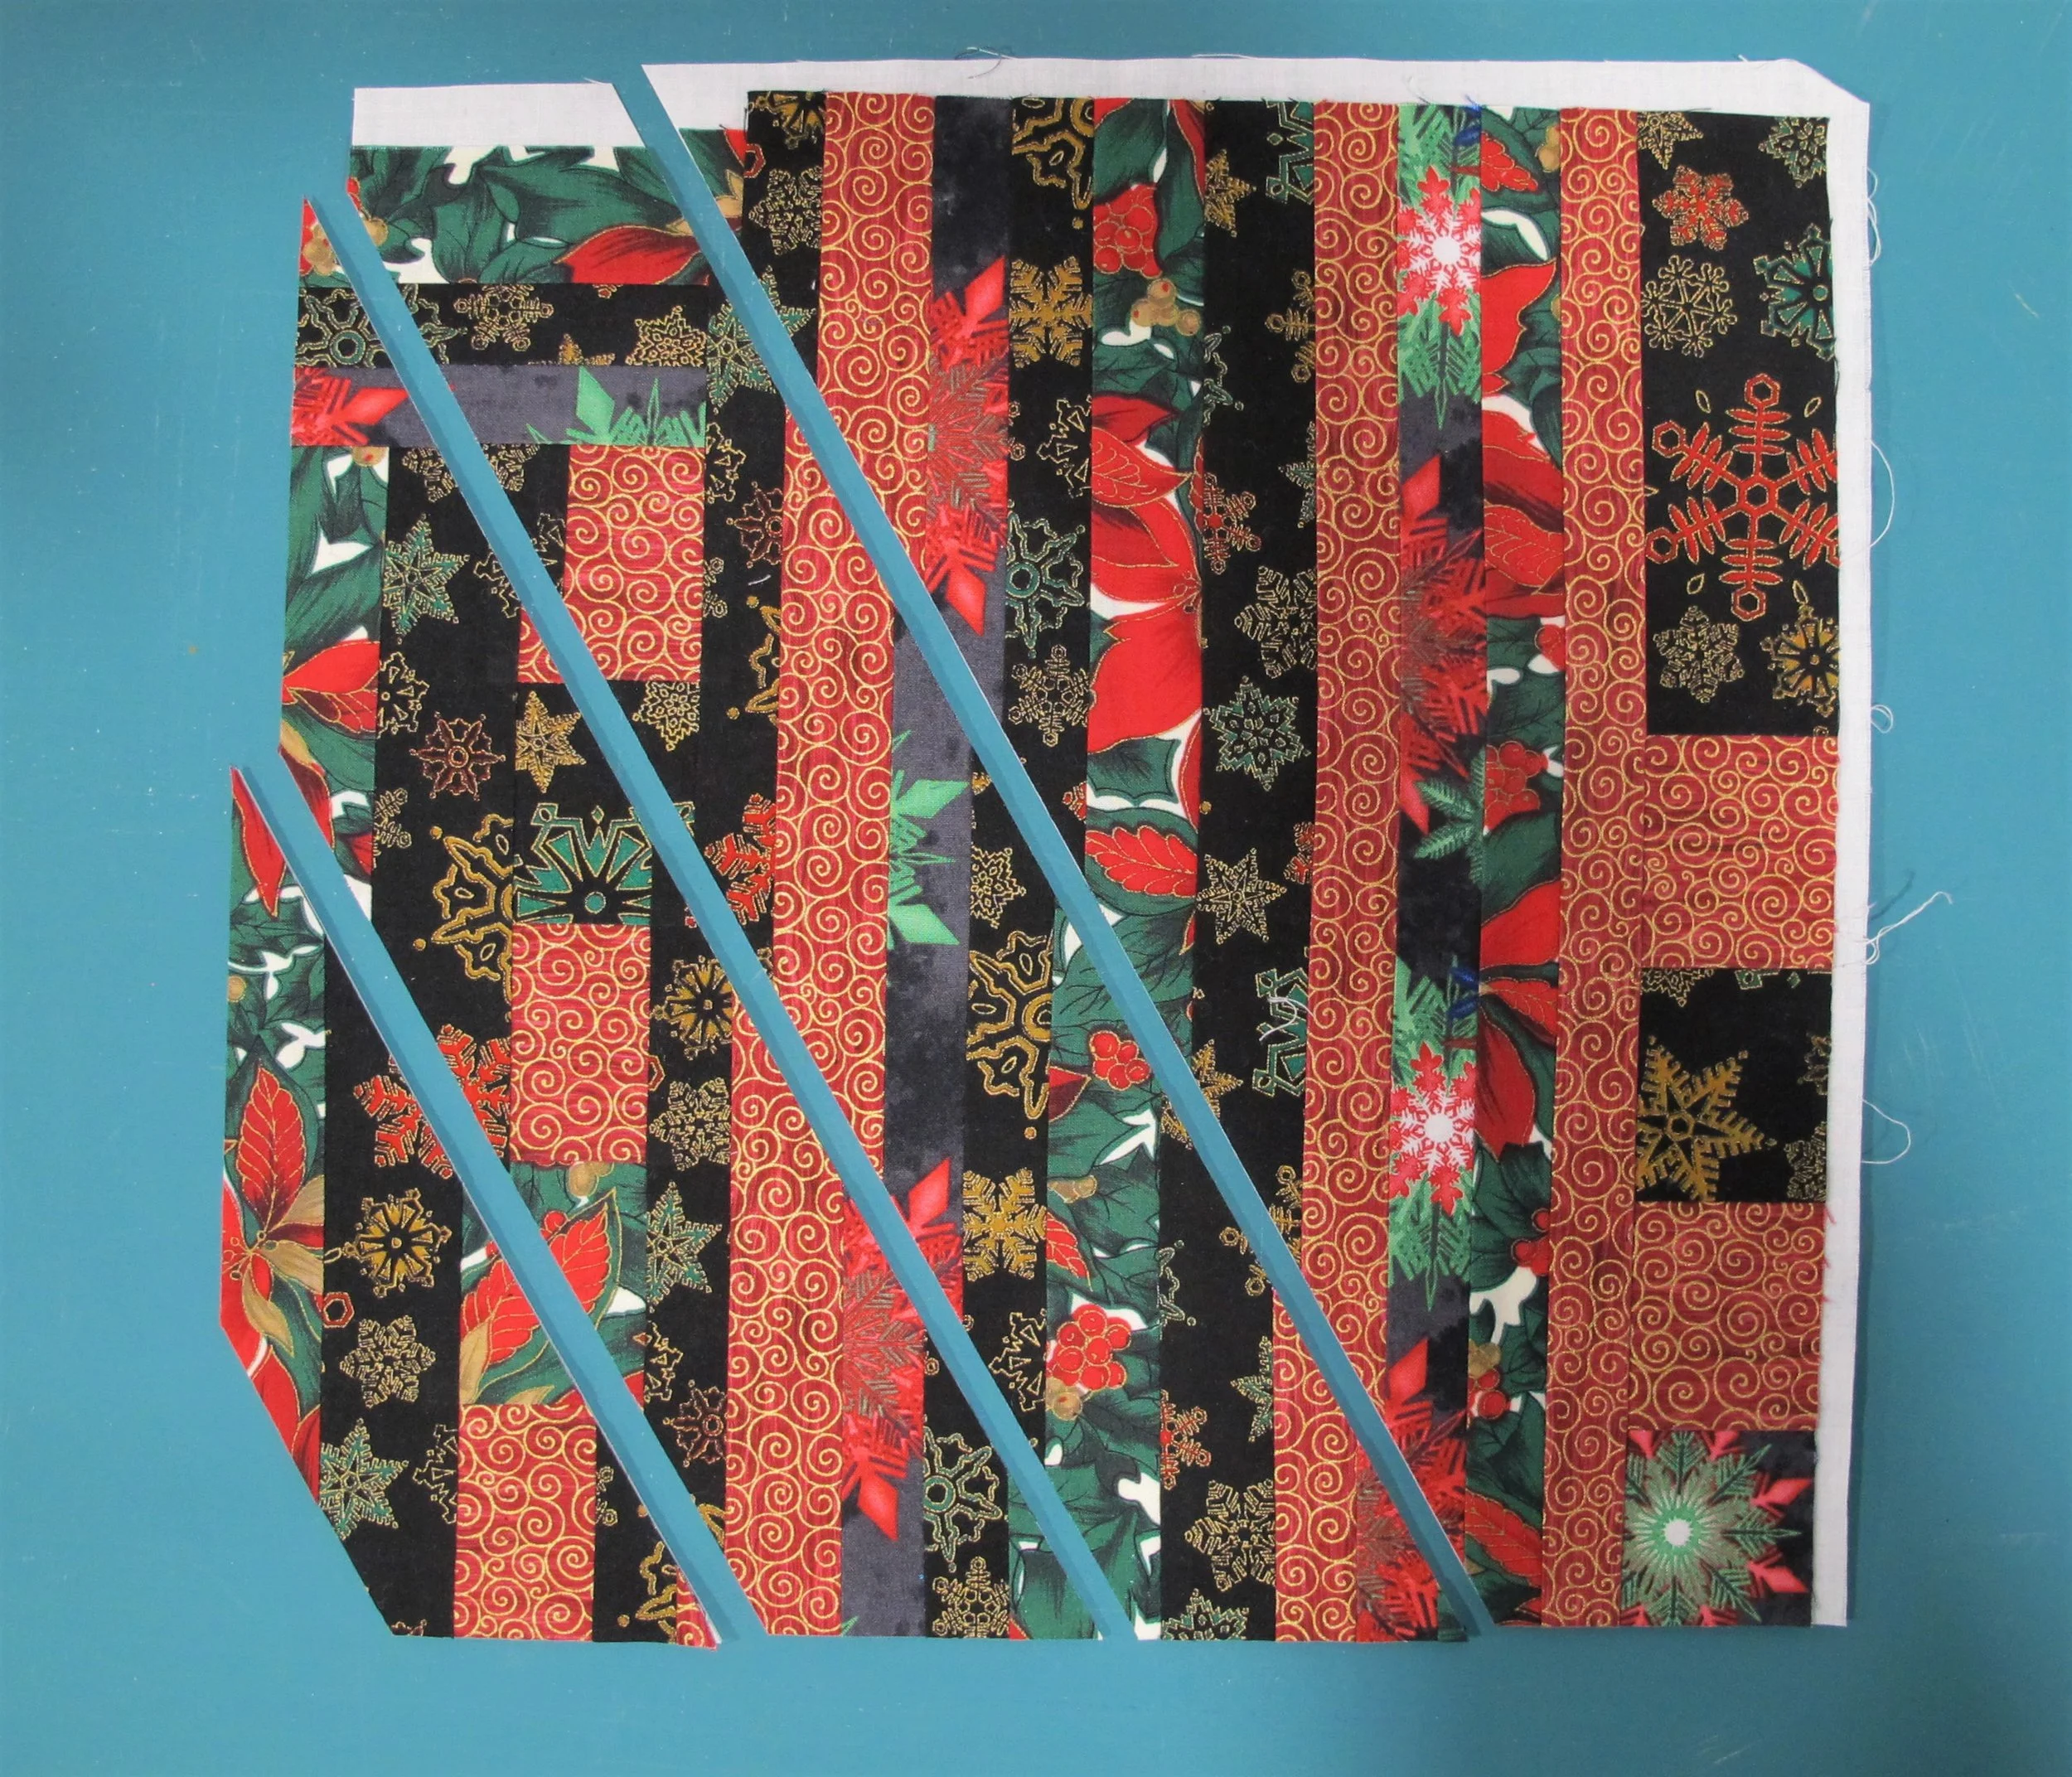
figure 5
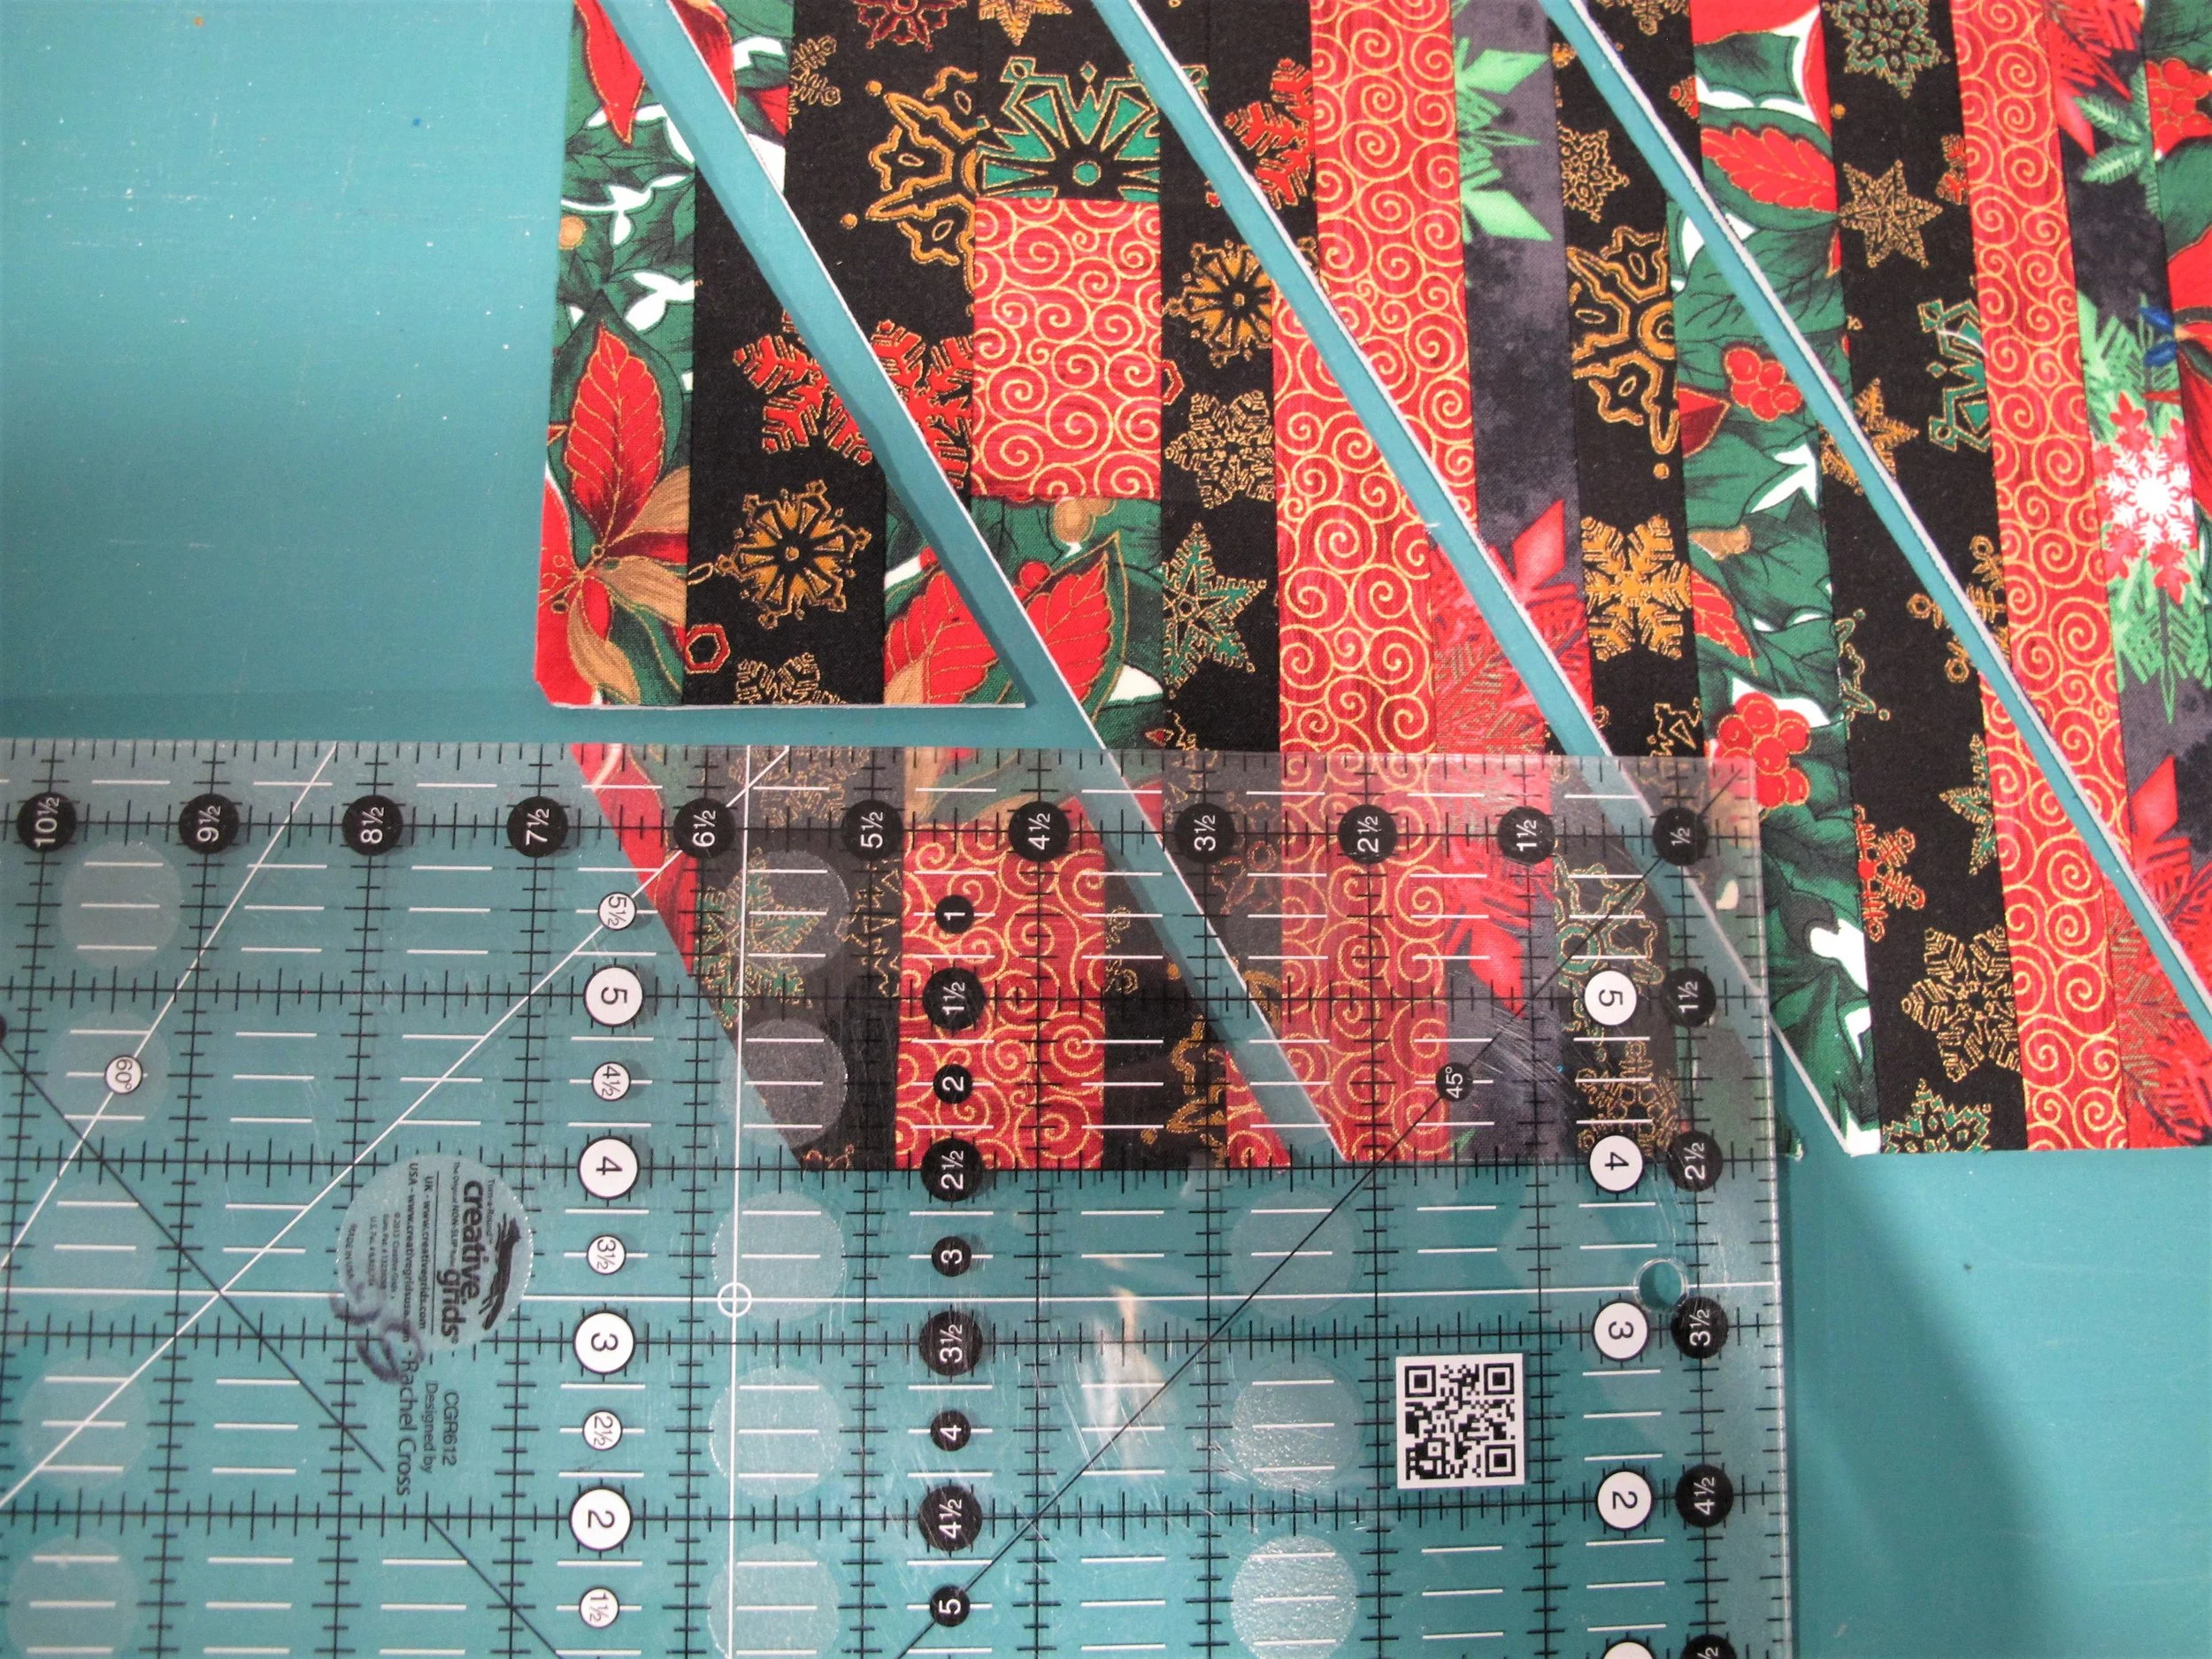
figure 6
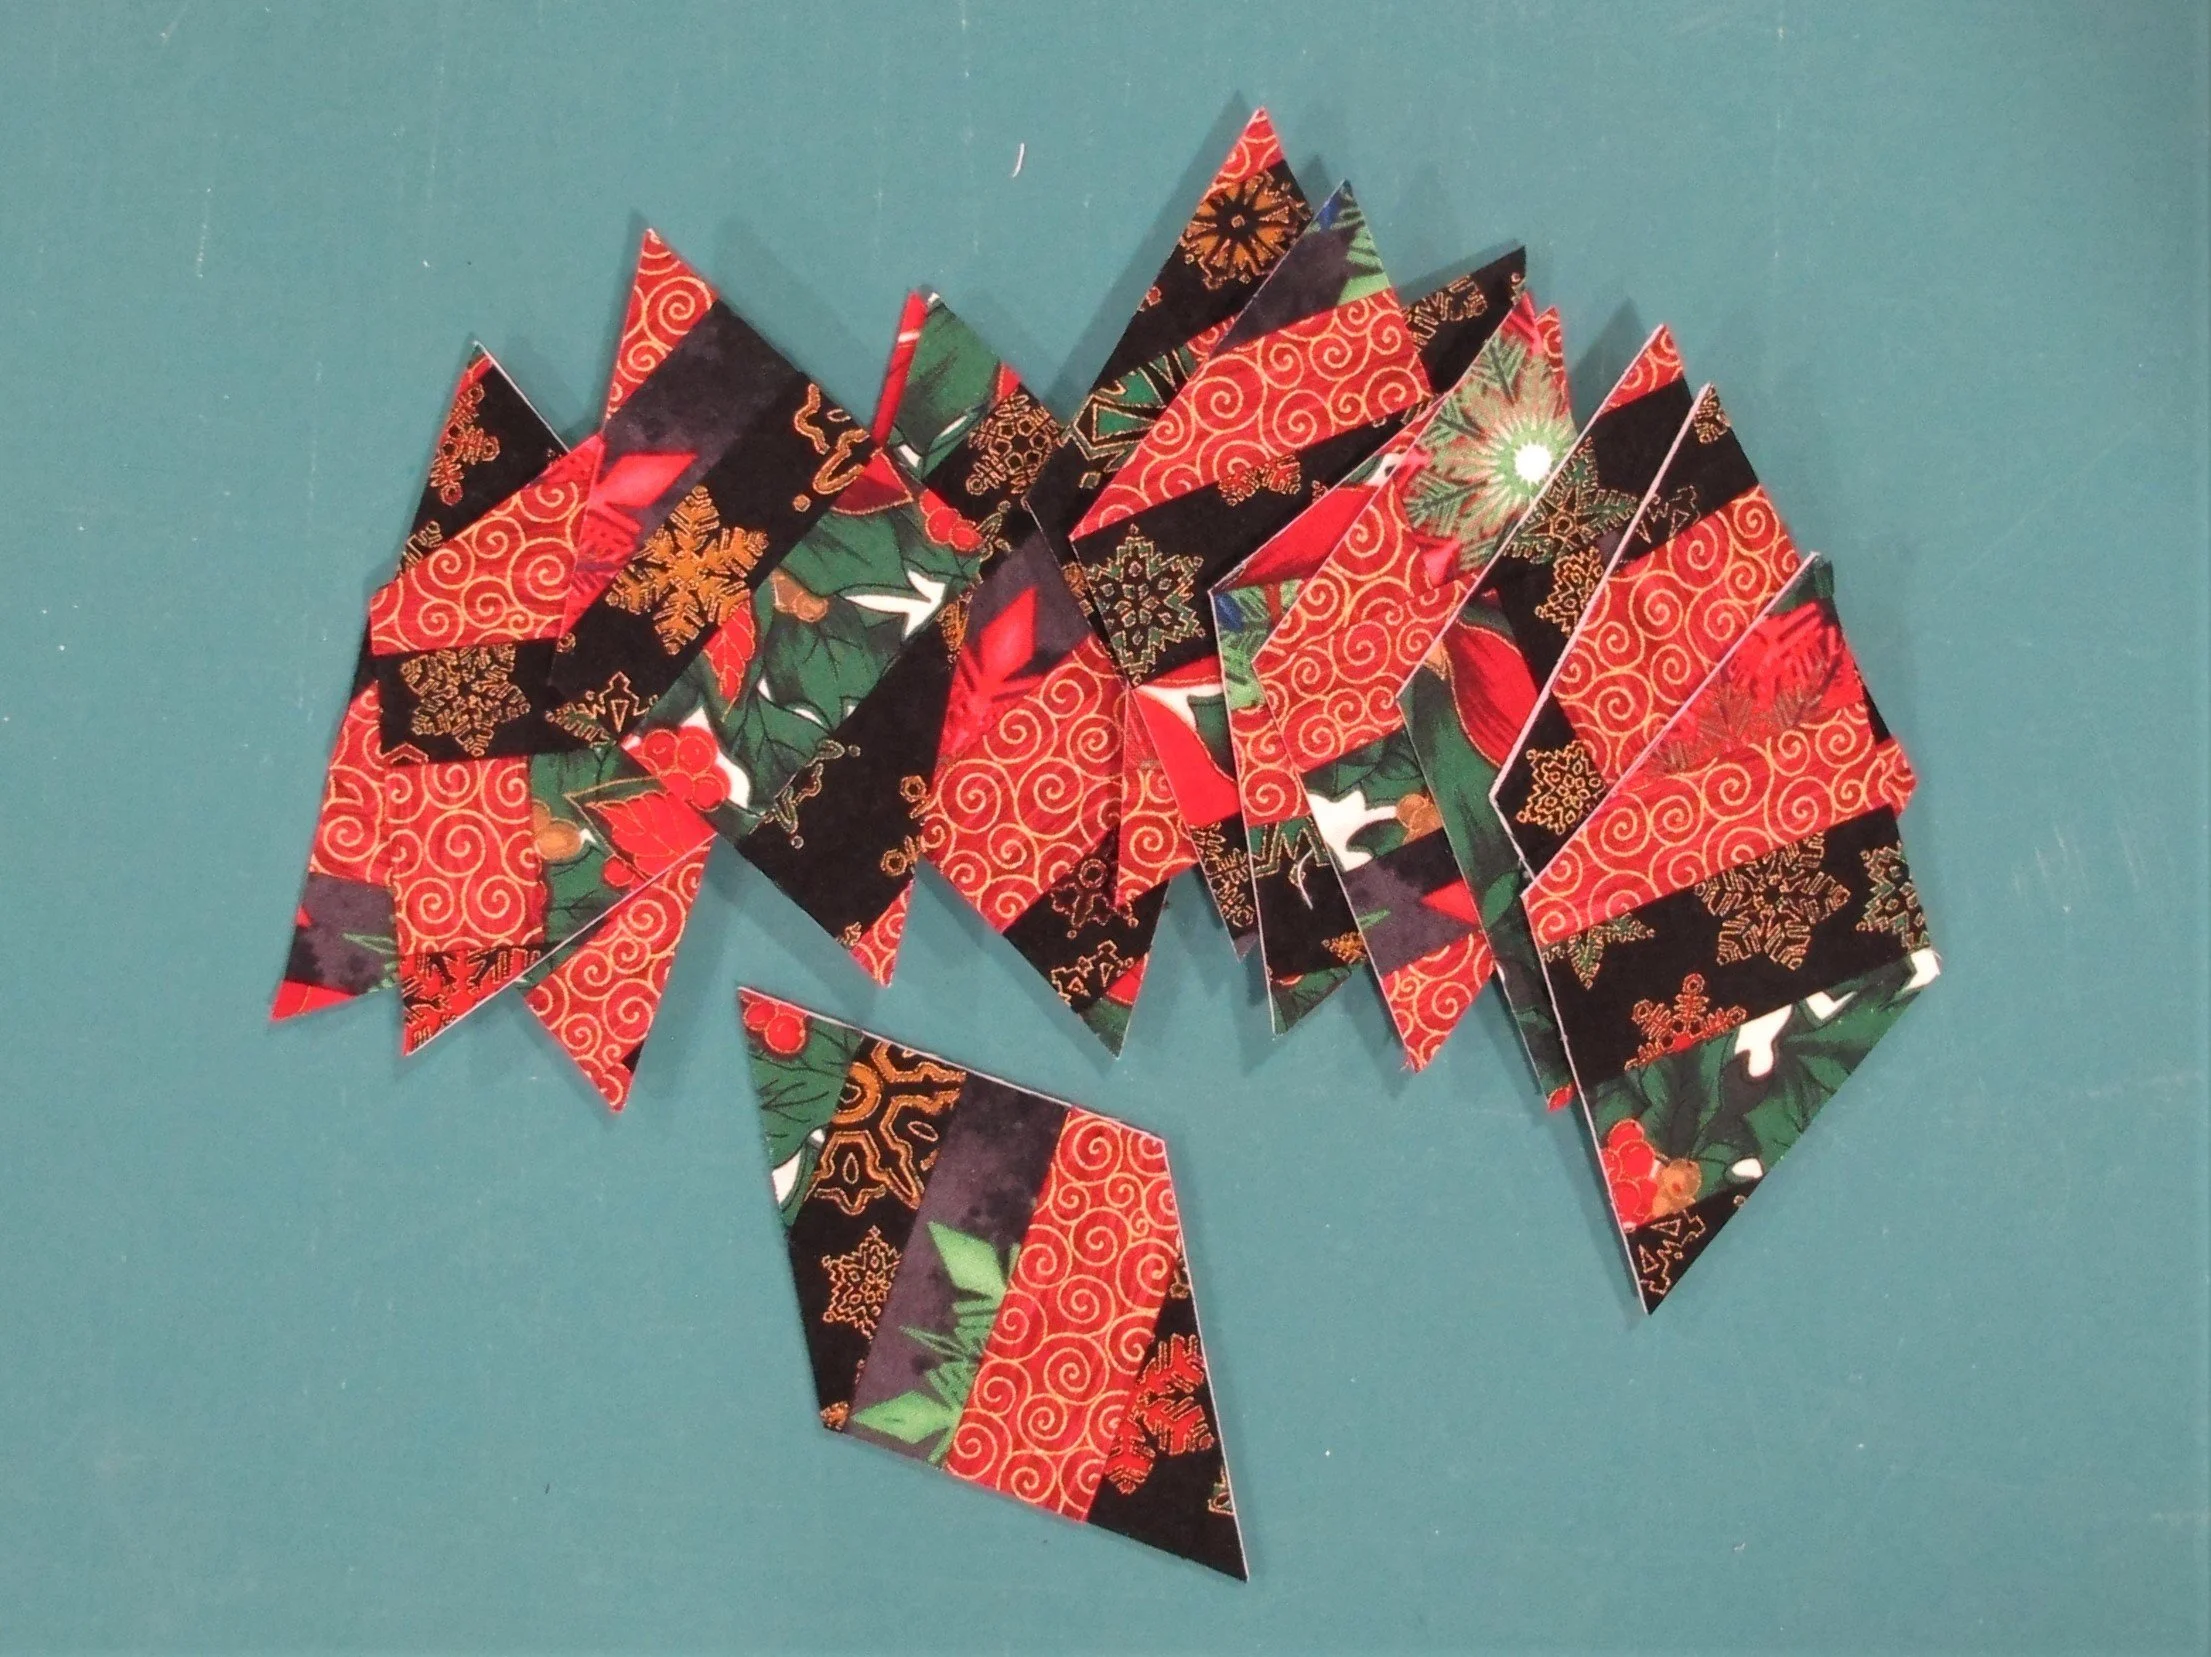
figure 7
Once all the tags are cut out it’s time to tart them up! There’s a decorative snowflake stitch (mode 2, stitch #098- 7.0 width, 3.5 length) on my Janome 6700P that I love to use on projects like this. This time I used my favourite metallic thread, Floriani (gold G3), with Aurifil 50 wt. colour 2920 (light brass) in the bobbin because it matches the metallic so well. Use a Topstitch needle (I used size 80/12) and if you have issues with metallic threads check out my Working With Unruly Threads post for some tips and tricks. Practice some decorative stitches on the off-cuts and when you find one you’re happy with it’s time to edgestitch around the diamonds. Start stitching at one of the points of the diamond and if your stitches aren’t that pretty there the ribbon loop will cover them up.
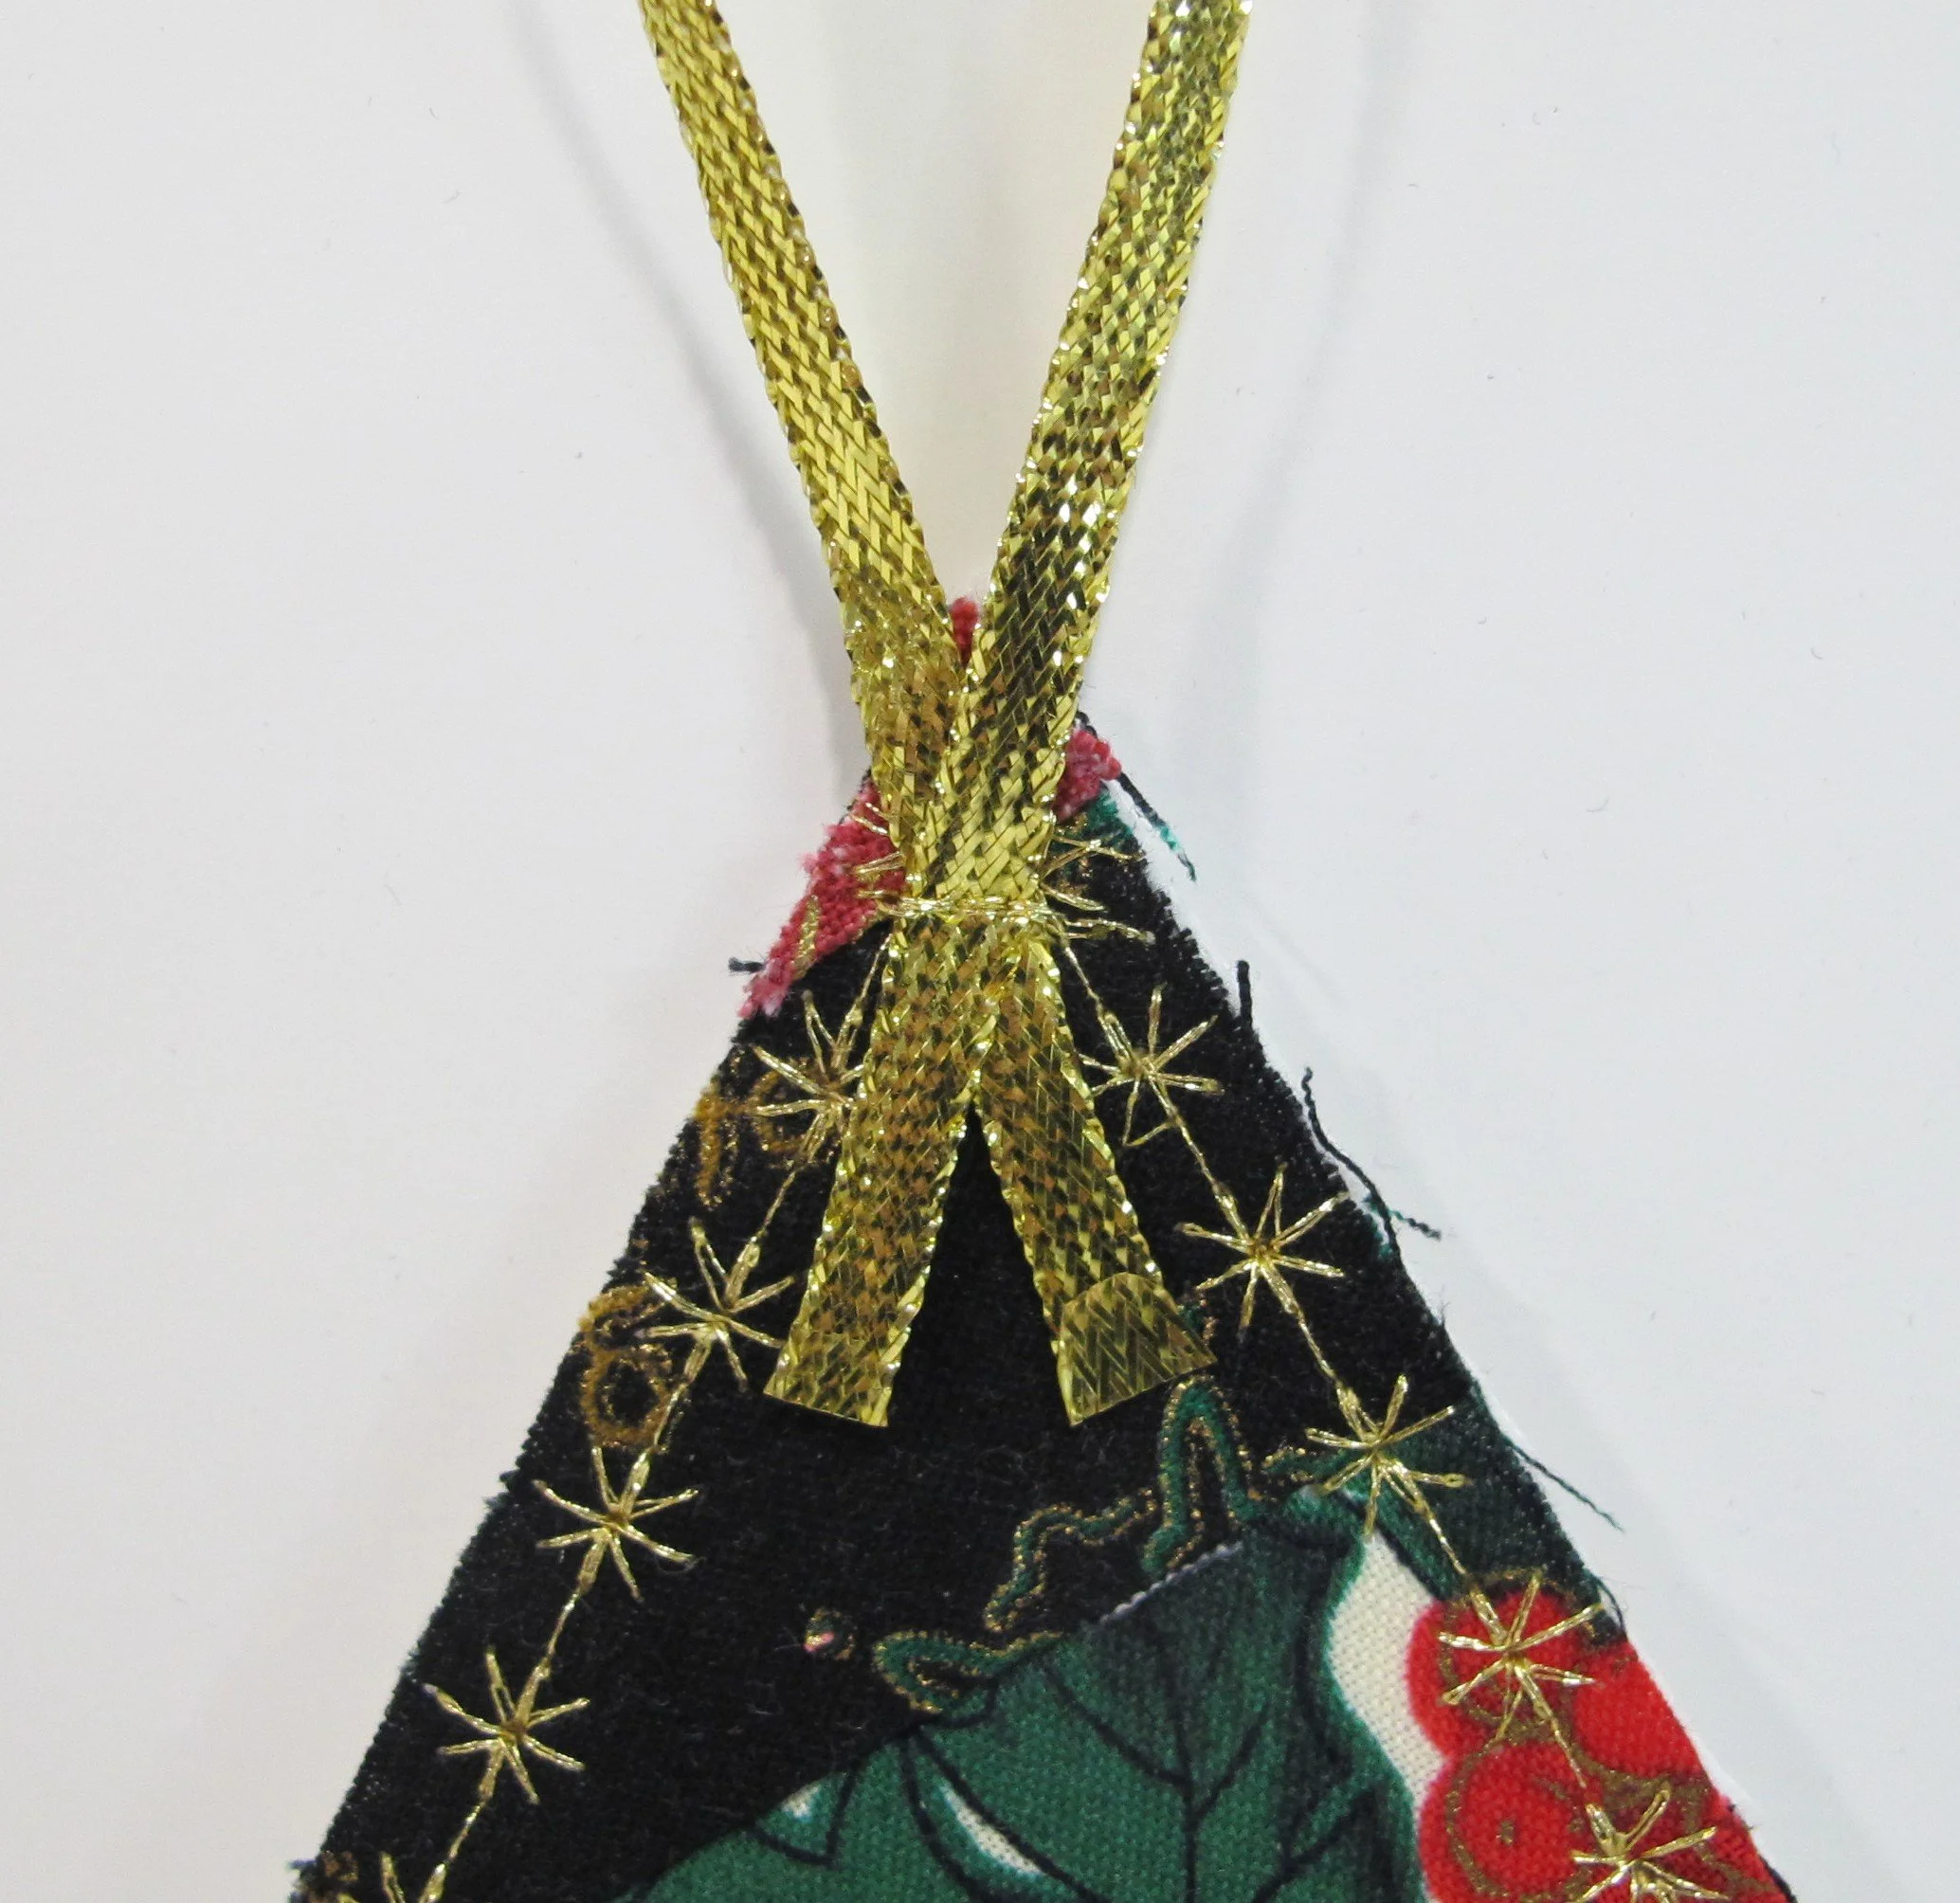
figure 8
Cut 8” lengths of ribbon or cording for the hanging loops. Sometimes the ribbon or cording will fray so before stitching them to the diamonds a spot of FrayCheck on the ends will stop the fraying process. Do this on top of a paper towel or sheet of paper to protect the table surface. Be sure to do a test…sometimes the liquid discolours the fabric or ribbon. Wait for the FrayCheck to dry before sewing the loops on.
Overlap and cross the two ends of the ribbon forming a loop at the top of the diamond. Stitch in place back and forth with a short straight stitch (figure 8). Optional: Once the loop is in place cover the stitching with a crystal or small button and randomly add crystals onto the diamond. I used a heat set crystallizer, but a good quality glue can be used for regular crystals or buttons. This glue by Beacon is my favourite for crafting.
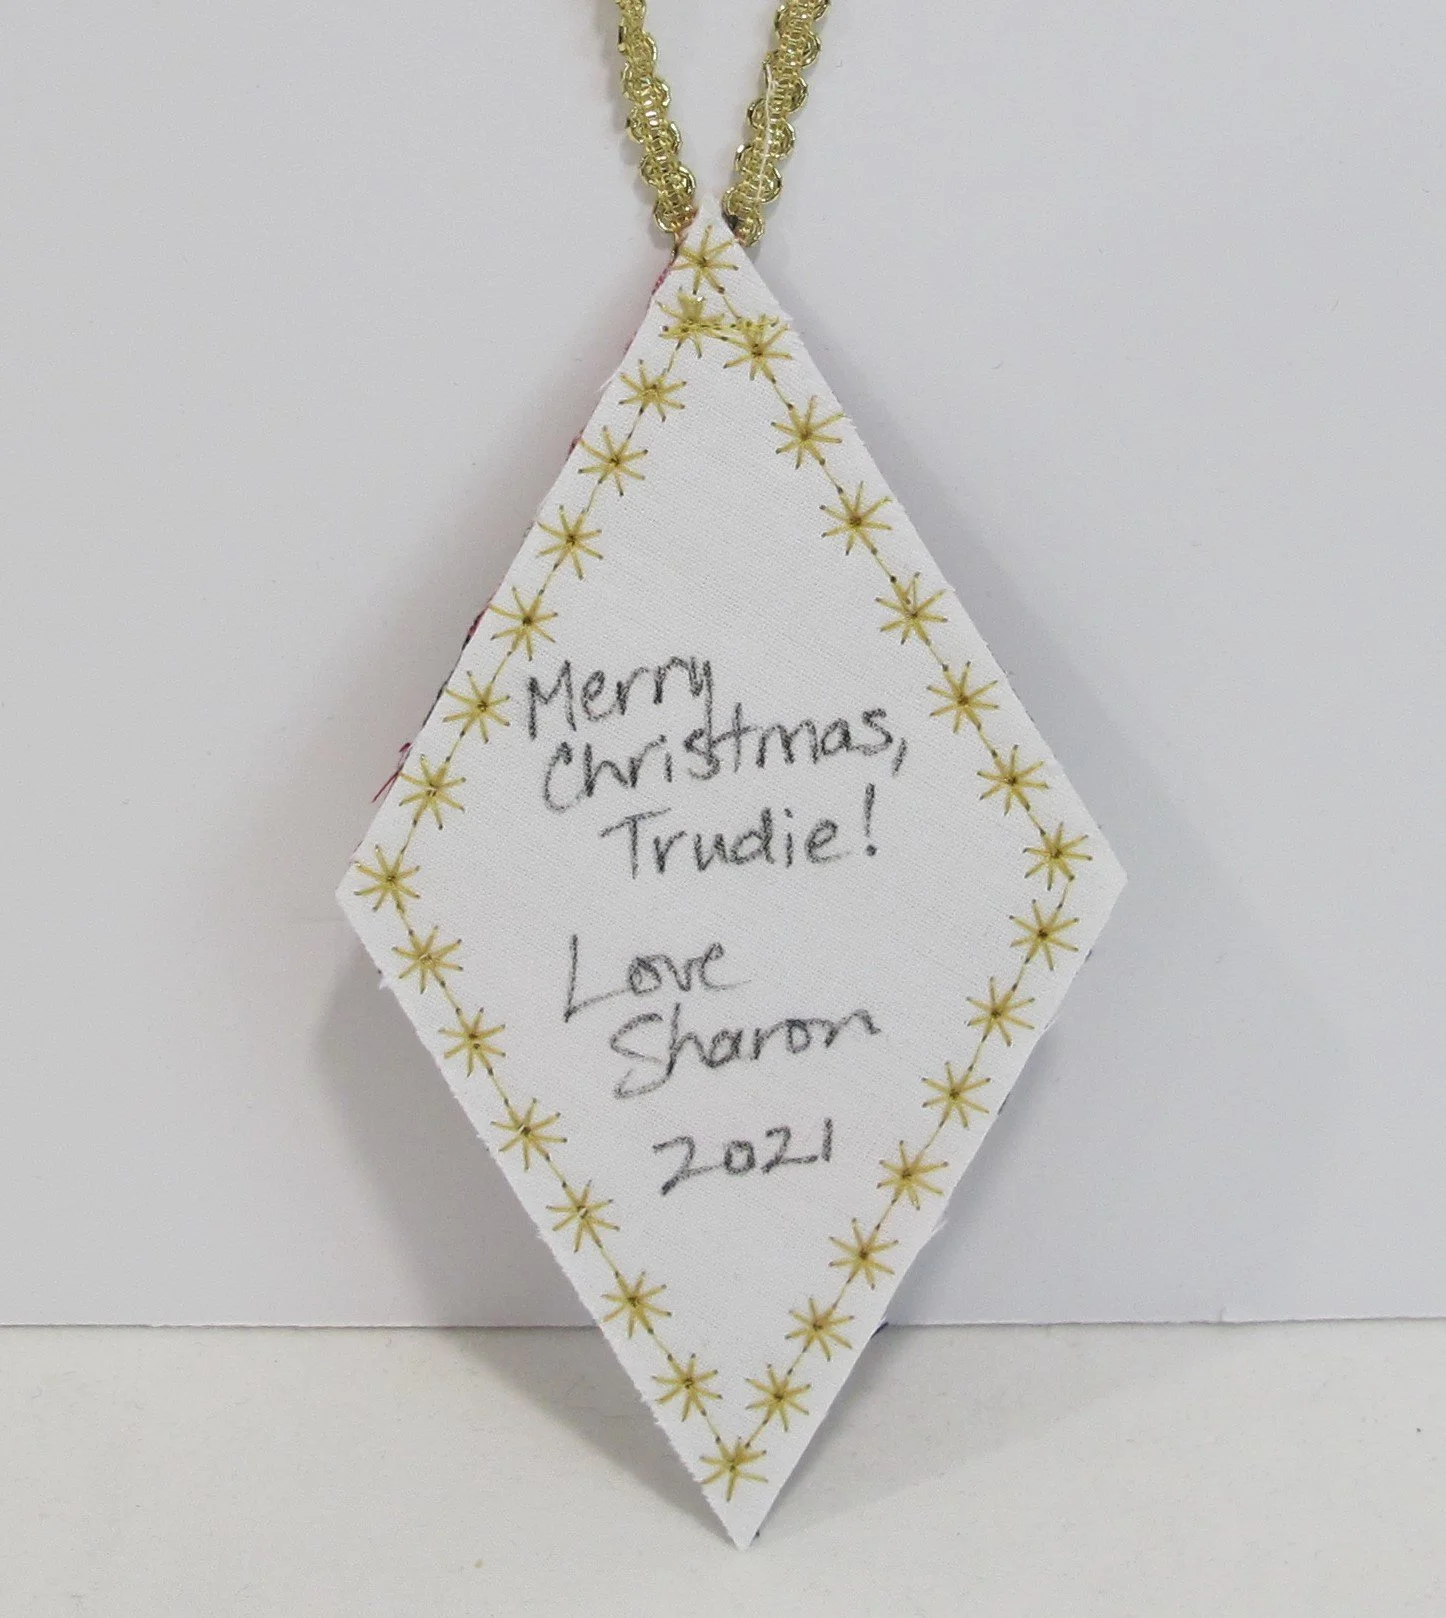
figure 9
Test the permanent marker for possible bleeding on the back of the off-cuts before writing on the actual tags. Some markers work better than others, but you might also have great luck using an ordinary pen. Once you find one you like use that to write on the back of the gift tags (figure 9). Not only will your hand-made gift tag add that special touch to the present, but it can be used by the recipient as a Christmas tree ornament after the gift has been opened. Don’t you love things that do double duty?!
I gave my neighbour, Aneita, a set for Christmas last year and told her that she could use them as gift tags on her own gifts, but she said she was going to be selfish and wanted all of them for her own tree! It’s always nice to give hand-made gifts to people who truly appreciate them. Have fun making your own.